제네릭
제네릭은 c#, java 등의 언어에서 재사용성이 높은 컴포넌트를 만들 때 자주 활용되는 특징입니다.
function logText<T>(text: T):T{
    console.log(text);
    return text;
}

logText<string>('hello');
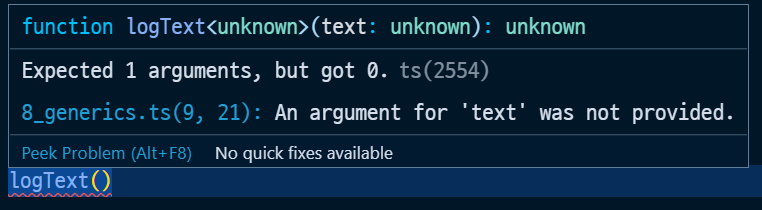

마치 타입을 함수의 파라미터 개념으로 받아올때 활용하는 개념이 제네릭이라고 할 수 있다.
제네릭을 활용하는 이유
 function logText(text: string){
     console.log(text);
     return text;
 }

 function logNumber(numbe: number){
     console.log(number);
     return number;
 }
같은 기능을 하더라도 타입을 지정해주기 위해서는 위와같이 같은 기능이지만 타입이 다른 함수를 두가지 설정해주거나 유니온 타입등을 정해줘야한다.
function logText(text: string | number){
    console.log(text);
    // string과 number을 모두 만족하는 교집합 안에서만 자동완성을 제공한다.
    return text;
}

const a = logText('a');
a.split('');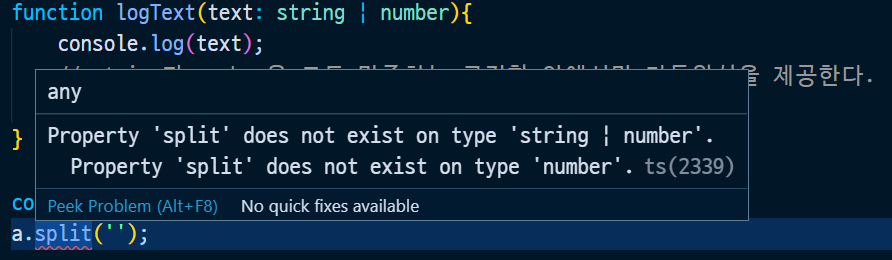
문자열을 넣었음에도 불구하고 정확한 타입 추정이 되지 않아 위와같은 오류가 발생한다.
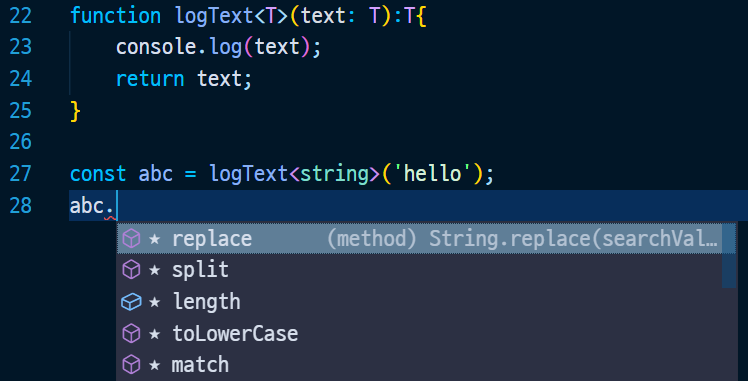
function logText<T>(text: T):T{
    console.log(text);
    return text;
}

const abc = logText<string>('hello');
abc.split("");
type을 호출 시점에 정의함으로써 위와같이 자동입력의 도움을 받을 수 있다.
제네릭 활용
index.html
<!DOCTYPE html>
<html lang="en">
  <head>
    <meta charset="UTF-8" />
    <meta name="viewport" content="width=device-width, initial-scale=1.0" />
    <title>Document</title>
  </head>
  <body>
    <div>
      <h1>이메일 선택 드롭다운</h1>
      <select id="email-dropdown">
        <option value="naver.com" selected>naver.com</option>
        <option value="google.com">google.com</option>
        <option value="hanmail.net">hanmail.net</option>
      </select>
    </div>
    <div>
      <h1>상품 수량 선택 드롭다운</h1>
      <select id="product-dropdown">
        <option value="1" selected>1</option>
        <option value="2">2</option>
        <option value="3">3</option>
      </select>
    </div>
  </body>
</html>
index.ts
const emails = [
  { value: 'naver.com', selected: true },
  { value: 'gmail.com', selected: false },
  { value: 'hanmail.net', selected: false },
];

const numberOfProducts = [
  { value: 1, selected: true },
  { value: 2, selected: false },
  { value: 3, selected: false },
];

function createDropdownItem(item) {
  const option = document.createElement('option');
  option.value = item.value.toString();
  option.innerText = item.value.toString();
  option.selected = item.selected;
  return option;
}

// NOTE: 이메일 드롭 다운 아이템 추가
emails.forEach(function (email) {
  const item = createDropdownItem(email);
  const selectTag = document.querySelector('#email-dropdown');
  selectTag.appendChild(item);
});
위의 형태를 타입으로 지정해준다.
index.ts
const emails: {value: string; selected:boolean}[] = [
  { value: 'naver.com', selected: true },
  { value: 'gmail.com', selected: false },
  { value: 'hanmail.net', selected: false },
];

const numberOfProducts: {value: number; selected:boolean}[] = [
  { value: 1, selected: true },
  { value: 2, selected: false },
  { value: 3, selected: false },
];

function createDropdownItem(item: {value: string; selected:boolean}) {
  const option = document.createElement('option');
  option.value = item.value.toString();
  option.innerText = item.value.toString();
  option.selected = item.selected;
  return option;
}

emails.forEach(function (email) {
  const item = createDropdownItem(email);
  const selectTag = document.querySelector('#email-dropdown');
  selectTag.appendChild(item);
});

numberOfProducts.forEach(function(product){
  const item = createDropdownItem(product);
  const selectTag = document.querySelector('#product-dropdown');
})
해당 경우에는 function createDropdownItem이 string 타입으로 지정되어있어 product 쪽에는 활용을 못하는 상황이다
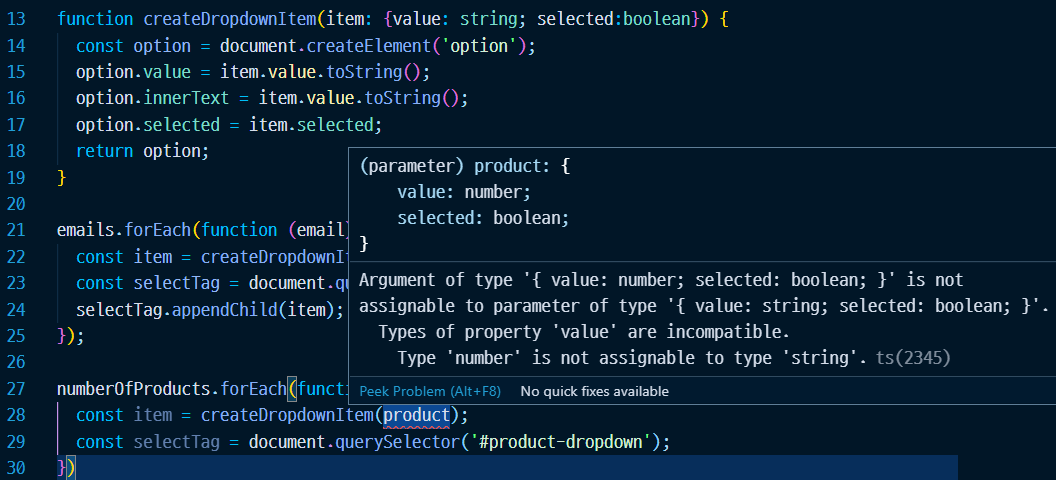
이를 해결하기위해서는
index.ts
interface Email{
  value: string;
  selected: boolean;
}

const emails: Email[] = [
  { value: 'naver.com', selected: true },
  { value: 'gmail.com', selected: false },
  { value: 'hanmail.net', selected: false },
];

interface Product{
  value: number;
  selected: boolean;
}

const numberOfProducts: Product[] = [
  { value: 1, selected: true },
  { value: 2, selected: false },
  { value: 3, selected: false },
];

function createDropdownItem(item: Email | Product) {
  const option = document.createElement('option');
  option.value = item.value.toString();
  option.innerText = item.value.toString();
  option.selected = item.selected;
  return option;
}

emails.forEach(function (email) {
  const item = createDropdownItem(email);
  const selectTag = document.querySelector('#email-dropdown');
  selectTag.appendChild(item);
});

numberOfProducts.forEach(function(product){
  const item = createDropdownItem(product);
  const selectTag = document.querySelector('#product-dropdown');
})
인터페이스와 유니온 타입을 활용한 방식으로 해결 할수 있다.
하지만 위의 방식은 매번 emails와 numberOfProducts 외에도 다른 타입들이 추가가 되면
매번 인터페이스로 지정을 해줘야한다. 이를 위해 제네릭을 활용한다.
interface DropDown<T>{
  value: T;
  selected: boolean;
}

const emails: DropDown<string>[] = [
  { value: 'naver.com', selected: true },
  { value: 'gmail.com', selected: false },
  { value: 'hanmail.net', selected: false },
];


const numberOfProducts: DropDown<number>[] = [
  { value: 1, selected: true },
  { value: 2, selected: false },
  { value: 3, selected: false },
];

function createDropdownItem(item: DropDown<string> | DropDown<number>) {
  const option = document.createElement('option');
  option.value = item.value.toString();
  option.innerText = item.value.toString();
  option.selected = item.selected;
  return option;
}

emails.forEach(function (email) {
  const item = createDropdownItem(email);
  const selectTag = document.querySelector('#email-dropdown');
  selectTag.appendChild(item);
});

numberOfProducts.forEach(function(product){
  const item = createDropdownItem(product);
  const selectTag = document.querySelector('#product-dropdown');
})
유니온 타입까지 제거하기위해서는
function을 다시 제네릭으로 받아서 호출시에 타입을 지정해준다.
interface DropDown<T>{
  value: T;
  selected: boolean;
}

const emails: DropDown<string>[] = [
  { value: 'naver.com', selected: true },
  { value: 'gmail.com', selected: false },
  { value: 'hanmail.net', selected: false },
];


const numberOfProducts: DropDown<number>[] = [
  { value: 1, selected: true },
  { value: 2, selected: false },
  { value: 3, selected: false },
];

function createDropdownItem<T>(item: DropDown<T> ) {
  const option = document.createElement('option');
  option.value = item.value.toString();
  option.innerText = item.value.toString();
  option.selected = item.selected;
  return option;
}

emails.forEach(function (email) {
  const item = createDropdownItem<string>(email);
  const selectTag = document.querySelector('#email-dropdown');
  selectTag.appendChild(item);
});

numberOfProducts.forEach(function(product){
  const item = createDropdownItem<number>(product);
  const selectTag = document.querySelector('#product-dropdown');
})
제네릭의 타입제한
function logTextLength<T>(text: T): T{
    // 해당타입에서는 어떤 타입이 들어올지 알 수 없다.
    console.log(text.length);
    return text;
}
logTextLength<string>('hi');
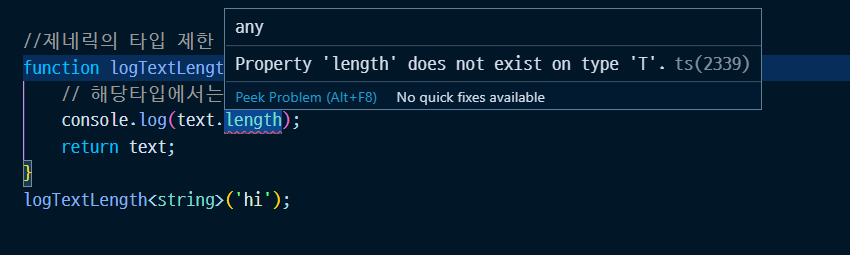
제네릭 부분에서 어떤 타입이 들어올 수 있는지 알 수 없기 때문에 text.length를 사용할때 오류가 발생한다
이떄 []등을 제네릭 뒤에 넣어줘서 힌트를 줄 수 있다.
//제네릭의 타입 제한
function logTextLength<T>(text: T[]): T[]{
    // 해당타입에서는 어떤 타입이 들어올지 알 수 없다.
    // 따라서 T[] 이런식으로 힌트를 줄 수 있다.
    console.log(text.length);
    text.forEach(function(text) {
        console.log(text);
    });
    return text;
}
logTextLength<string>(['hi', 'abc']);
또는 정의된타입을 이용해서 타입을 제한해 줄 수 있다.
//타입제한 2 정의된 타입 이용하기
interface LengthType {
    length: number;
}

function logTextLength<T extends LengthType>(text: T): T{
    console.log(text.length);
    return text;
}

logTextLength('hi');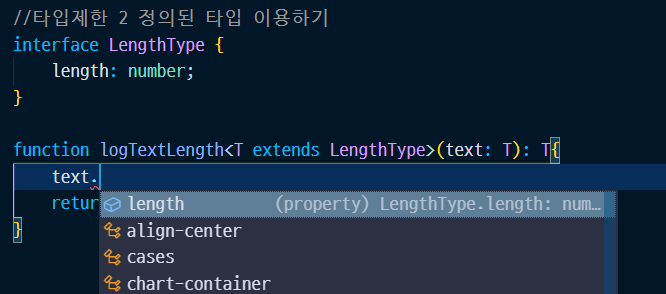
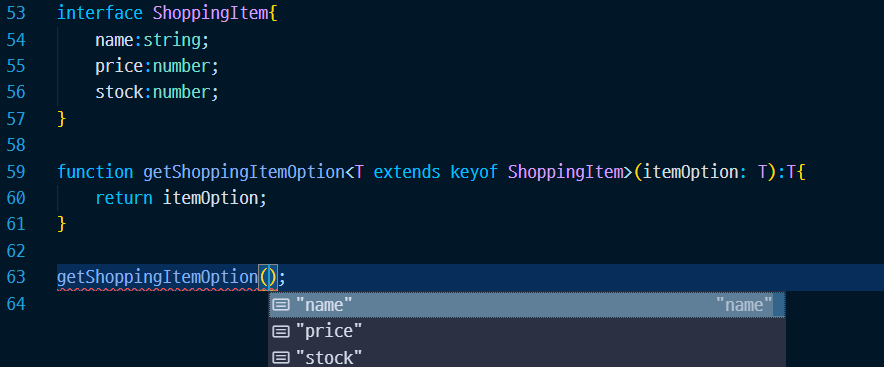
또는 keyof를 활용해서 타입을 제한해 줄수 도 있다.
interface ShoppingItem{
    name:string;
    price:number;
    stock:number;
}

function getShoppingItemOption<T extends keyof ShoppingItem>(itemOption: T):T{
    return itemOption;
}

getShoppingItemOption("price");
keyof를 활용하면 interface에 선언한 인자중 한가지만 파라미터로 받아올 수 있다.
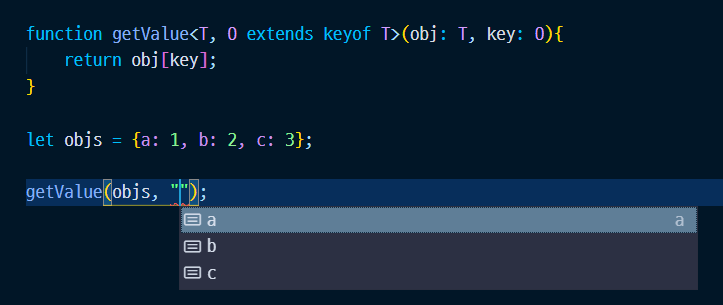
function getValue<T, O extends keyof T>(obj: T, key: O){
    return obj[key];
}

let objs = {a: 1, b: 2, c: 3};

getValue(objs, "b");
위와같은 방법으로도 활용이 가능하다.
www.inflearn.com/course/%ED%83%80%EC%9E%85%EC%8A%A4%ED%81%AC%EB%A6%BD%ED%8A%B8-%EC%9E%85%EB%AC%B8
해당 강의를 듣고 정리하는 내용입니다.
'JavaScript > Typescript' 카테고리의 다른 글
| Typescript 입문 - 타입 단언 / 타입 가드 (0) | 2020.12.21 |
|---|---|
| Typescript 입문 - 클래스 (0) | 2020.11.29 |
| Typescript 입문 - 인터페이스 / 타입 별칭 (0) | 2020.11.15 |
| Typescript 입문 - 변수와 함수 타입 정의 (0) | 2020.11.14 |
| Typescript 입문 - 타입스크립트 설치하기 (0) | 2020.11.13 |


