Node Sequelize ORM 다루기 - DB 생성및 테이블 생성하기
Sequelieze는 Node에서 사용하는 ORM이다. 여기서 ORM 이란? ORM은 Object Relational Mapping의 약자로써 OOP(Object Oritented Programming)에서 객체로 구현한 부분을 DB와 자동으로 매핑해주는 것을 의미해준..
loy124.tistory.com
해당글은 위 글에 이어서 작성하는 글입니다.
관계형 설정과 외래키 설정을 위해
테이블을 두개 만들어줄 것이다.
게시글 과 댓글 설계를 예로 관계형을 설정해줄 것이다
- 하나의 게시글은 많은 댓글을 가지고 있다.
- 댓글은 게시글의 고유 key(id)를 외래키로 가지고 있다.
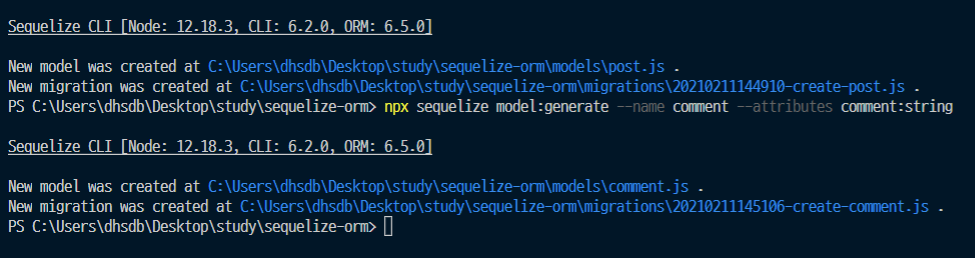
이를 위해 post 모델과 comment 모델을 만들어 준다.
npx sequelize model:generate --name post --attributes title:string,content:string npx sequelize model:generate --name comment --attributes comment:string
이제 생성된 migration 파일들을 migrate 해준다.
npx sequelize db:migrate
이제 기본적인 준비는 끝이 났다.
이제 해줄 일들은 두가지 남았다.
- migration 부분에서 comment 부분에 외래키 설정하기
- model 부분에서 관계형 매핑해주기
post는 comment를 여러개 가지고 있다(1:N관계, hasMany)
post에 comment는 belongsTo를 활용해준다.
외래키 설정하기
먼저 외래키 설정을 위한 migration file을 하나 생성해준다.
npx sequelize migration:generate --name fk-comment

먼저 post_id라는 컬럼을 추가해주고 그후 해당 post_id 컬럼에 foreign key를 등록해주는 방식이다.
"use strict";

module.exports = {
  up: async (queryInterface, Sequelize) => {
    await queryInterface.addColumn("comments", "post_id", {
      type: Sequelize.INTEGER,
    });
    await queryInterface.addConstraint("comments", {
      fields: ["post_id"],
      type: "foreign key",
      name: "posts_comments_id_fk",
      references: {
        table: "posts",
        field: "id",
      },
      onDelete: "cascade",
      onUpdate: "cascade",
    });

  },

  down: async (queryInterface, Sequelize) => {
    await queryInterface.removeColumn("comments", "post_id");
  },
};
sequelize에서는 외래키를 연동하는 메서드도 제공하고 있는데
queryInterface.addConstraint 메소드를 활용해서 foreign key를 추가해줄 수 있다.

model 매핑하기
이제 migration을 통해 DB의 내용은 변경해주었으나 Model에서 매핑은 아직 진행하지 않았다.
1:N 관계 설정
1대 다 관계(EX) 유저(1) 가 게시글들(N)을 보유)
hasMany < - > belongsTo
1:1 관계 설정
hasOne < -> belongsTo
N:M 관계 설정
belongsToMany
(ex: 게시글은 여러개의 해시태그를 가진다. 해시태그는 여러개의 게시글을 가진다)
쇼핑몰에서 회원 < -> 주문 목록 <-> 상품
회원입장에서 주문 목록 을 여러개 가질수 있고
주문목록 기준에서 주문목록 하나에 상품이 여러개 있을수 있다

models/post.js
'use strict';
const {
  Model
} = require('sequelize');
module.exports = (sequelize, DataTypes) => {
  class post extends Model {
    /**
     * Helper method for defining associations.
     * This method is not a part of Sequelize lifecycle.
     * The `models/index` file will call this method automatically.
     */
    static associate(models) {
      // define association here
      models.post.hasMany(models.comment, {foreignKey: "post_id"})
    }
  };
  post.init({
    title: DataTypes.STRING,
    content: DataTypes.STRING
  }, {
    sequelize,
    modelName: 'post',
  });
  return post;
};
post는 commnet를 여러개 가지고 있기 때문에 hasMany를 통해 관계를 지정해준다.
comment는 post에 종속된다.
models/comment.js
'use strict';
const {
  Model
} = require('sequelize');
module.exports = (sequelize, DataTypes) => {
  class comment extends Model {
    /**
     * Helper method for defining associations.
     * This method is not a part of Sequelize lifecycle.
     * The `models/index` file will call this method automatically.
     */
    static associate(models) {
      // define association here
      models.comment.belongsTo(models.post, {foreignKey: 'post_id'})
    }
  };
  comment.init({
    comment: DataTypes.STRING
  }, {
    sequelize,
    modelName: 'comment',
  });
  return comment;
};
위와같이 진행하게 되면 관계형 Model mapping은 마무리된다.
이제 dummy data를 넣을 차례이다.
 npx sequelize seed:generate --name post
 npx sequelize seed:generate --name comment
post에 대한 dummy data와 comment에 대한 dummy data를 넣기 위해 seed 파일을 생성해준다.
seeders/postAndComment
"use strict";

module.exports = {
  up: async (queryInterface, Sequelize) => {
    const postId = await queryInterface.bulkInsert(
      "posts",
      [
        {
          title: "test1",
          content: "test1",
          createdAt: new Date(),
          updatedAt: new Date(),
        },
        {
          title: "test2",
          content: "test2",
          createdAt: new Date(),
          updatedAt: new Date(),
        },
        {
          title: "test3",
          content: "test3",
          createdAt: new Date(),
          updatedAt: new Date(),
        },
      ],
      { returning: ["id"] }
    );
    await queryInterface.bulkInsert("comments", [
      {
        comment: "test1",
        createdAt: new Date(),
        updatedAt: new Date(),
        post_id: postId,
      },
      {
        comment: "test2",
        createdAt: new Date(),
        updatedAt: new Date(),
        post_id: postId,
      },
      {
        comment: "test3",
        createdAt: new Date(),
        updatedAt: new Date(),
        post_id: postId,
      },
    ]);
  },

  down: async (queryInterface, Sequelize) => {
    await queryInterface.bulkDelete("posts", null, {});
    await queryInterface.bulkDelete("comments", null, {});
    /**
     * Add commands to revert seed here.
     *
     * Example:
     * await queryInterface.bulkDelete('People', null, {});
     */
  },
};
Comment에는 외래키가 존재하기 때문에 일반적인 seed와 다르게 id값을 넣어줘야한다.
await queryInterface.bulkInsert(
      "posts",[{}],  returning: ["id"] }
    );
returning: ["id"]를 주게 되면 해당 데이터의 id값만 리턴하게 된다. 해당 id를 받아서 comments의 board_id에 넣어준다.


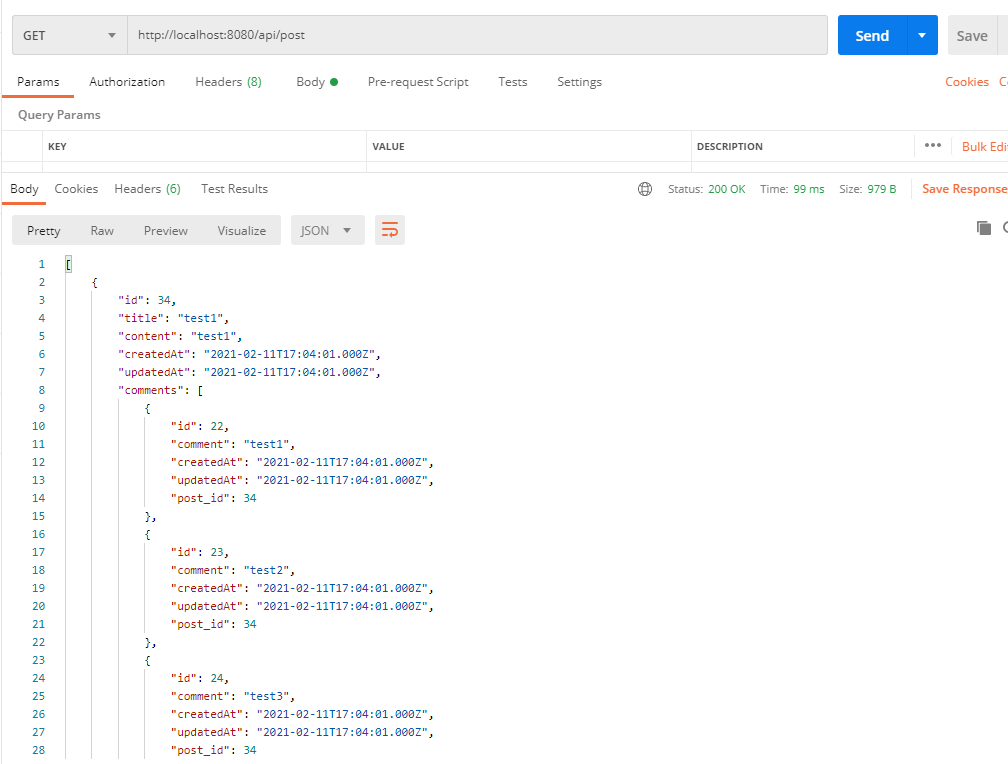
정상적으로 table에 값이 들어간것을 확인 할 수 있다.
이로써 sequelize 를 통해 외래키를 추가및 db에 더미데이터에 넣기에 대해 완료하였다.
API 만들기
만든 post와 comment를 활용해 데이터를 넣는 API를 만들어 보려 한다.
만들고 테스트는 전부 POSTMAN을 활용해서 진행할 예정이다.
먼저 index.js를 만들어준다.
index.js
기초 express 구조를 잡아준다.
const express = require('express');
const app = express();
const PORT = 8080;
const db = require('./models');

app.use(express.json());
app.use(express.urlencoded({extended:false}));

app.get("/", (req,res) => {
    res.json({hello: 'world'})
});

app.listen(PORT, () => console.log(`this server listening on ${PORT}`));
npx nodemon index.js서버를 nodemon을 통해 기동시켜준다. nodemon을 활용하면 저장시마다 서버를 reload 해준다.
const express = require('express');
const app = express();
const PORT = 8080;
const db = require('./models');

app.use(express.json());
app.use(express.urlencoded({extended:false}));

app.get("/", (req,res) => {
    res.json({hello: 'world'})
});

app.get("/api/post", async (req, res) => {
    const result = await db['post'].findAll();
    res.json(result);
})


app.listen(PORT, () => console.log(`this server listening on ${PORT}`));
postman을 통해 1차적으로 게시글을 잘 가져오는지 확인한다.

index.js
sequelize에서 model에 대한 설정이 잘 되어있다면
include를 활용해서 board id가 등록된 comment 들을 가져올 수 있다
const express = require('express');
const app = express();
const PORT = 8080;
const db = require('./models');

app.use(express.json());
app.use(express.urlencoded({extended:false}));

app.get("/", (req,res) => {
    res.json({hello: 'world'})
});

app.get("/api/post", async (req, res) => {
    const result = await db['post'].findAll({
        include:[
            {model: db['comment']}
        ]
    });
    res.json(result);
})


app.listen(PORT, () => console.log(`this server listening on ${PORT}`));
이것으로 sequelize 외래키 설정및 관계형 설정을 마무리 하였다.
나머지 부족하거나 모르는 부분들은 sequelize 공식 docment를 참고하면 좋을거라 생각된다.
sequelize.org/master/identifiers.html
Reference | Sequelize
V Op: {"eq": *, "ne": *, "gte": *, "gt": *, "lte": *, "lt": *, "not": *, "is": *, "in": *, "notIn": *, "like": *, "notLike": *, "iLike": *, "notILike": *, "startsWith": *, "endsWith": *, "substring": *, "regexp": *, "notRegexp": *, "iRegexp": *, "notIRegex
sequelize.org
'Node.js > node sequelize' 카테고리의 다른 글
| Node Sequelize ORM 다루기 - DB 생성및 테이블 생성하기 (0) | 2021.02.11 |
|---|---|
| node mysql sequelize(2) 연관 관계 설정하기 (0) | 2020.08.22 |
| node mysql sequelize(1) mysql 연동및 테이블 생성하기 (0) | 2020.08.22 |


