이전부터 github에서 gh-pages 등을 활용해서 웹 페이지에 정적 웹 페이지 호스팅을 하는 방법들이 존재했지만
조금 더 쉽고 간편하게 호스팅 하는 방법이 홈페이지에 공개되어있어 관련 포스팅을 써봅니다.
(GIT 기초 명령어정리)
https://loy124.tistory.com/91?category=743830
GIT 기초 명령어 및 GITHUB와 연동하기 및 삭제하기
git을 기본적으로 처음 깔았을떄 해야하는것 git config --global user.name "사용자" git config --global user.email "사용자 이메일" (깃허브의 이메일 주소) cmd창에 등록 git status git..
loy124.tistory.com
GIT 및 GITHUB 관련 명령어들은 상단에 작성해 두었습니다.
이제 크게 두가지 작업이 필요합니다.
1. GIT에서 내용을 추가해서 GITHUB에 올리는 작업 (git <-> github repository 일치화)
(해당 내용에 대해서 아신다면 2번부터 보시면 되겠습니다. )
2. 호스팅하기
1. GIT <-> GITHUB Repository 일치화
먼저 hosting을 테스트하기 위해 정말 간단한 index.html, index2.html, index3.html 세가지를 만들었습니다.

index.html
<!DOCTYPE html>
<html lang="en">
<head>
    <meta charset="UTF-8">
    <meta http-equiv="X-UA-Compatible" content="IE=edge">
    <meta name="viewport" content="width=device-width, initial-scale=1.0">
    <title>Document</title>
</head>
<body>
    <a href="./index2.html"> index2.html 로 이동</a>
    <a href="./index3.html"> index3.html 로 이동</a>

</body>
</html>
index2.html
<!DOCTYPE html>
<html lang="en">
<head>
    <meta charset="UTF-8">
    <meta http-equiv="X-UA-Compatible" content="IE=edge">
    <meta name="viewport" content="width=device-width, initial-scale=1.0">
    <title>Document</title>
</head>
<body>
    <a href="./index.html"> index.html 로 이동</a>
    <a href="./index3.html"> index3.html 로 이동</a>
</body>
</html>
index3.html
<!DOCTYPE html>
<html lang="en">
<head>
    <meta charset="UTF-8">
    <meta http-equiv="X-UA-Compatible" content="IE=edge">
    <meta name="viewport" content="width=device-width, initial-scale=1.0">
    <title>Document</title>
</head>
<body>
    <a href="./index.html"> index.html 로 이동</a>
    <a href="./index2.html"> index2.html 로 이동</a>
</body>
</html>
여기 까지 작성하였다면
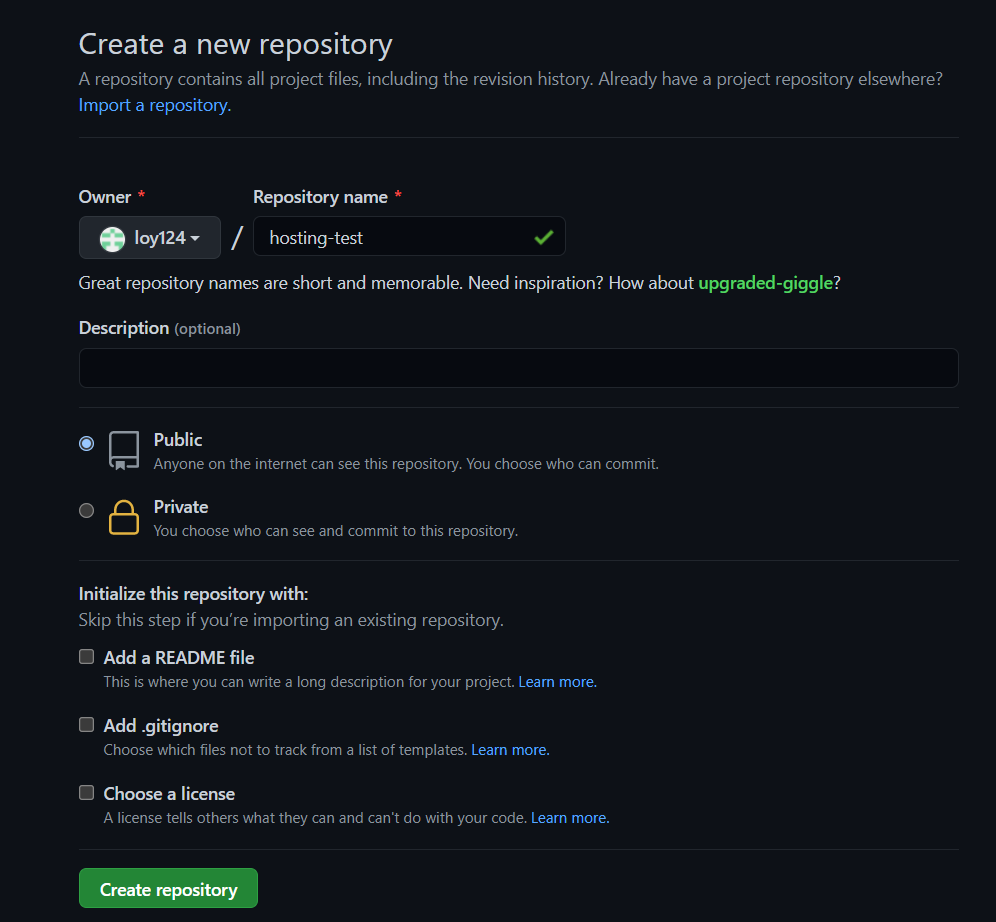
이제 github에 repository를 생성한다.

public 상태로 작성 한 후

해당 명령 상단을 복사해서
일단 Online Repository와 Local Repository를 일치화 시킨다..

여기까지 진행하면

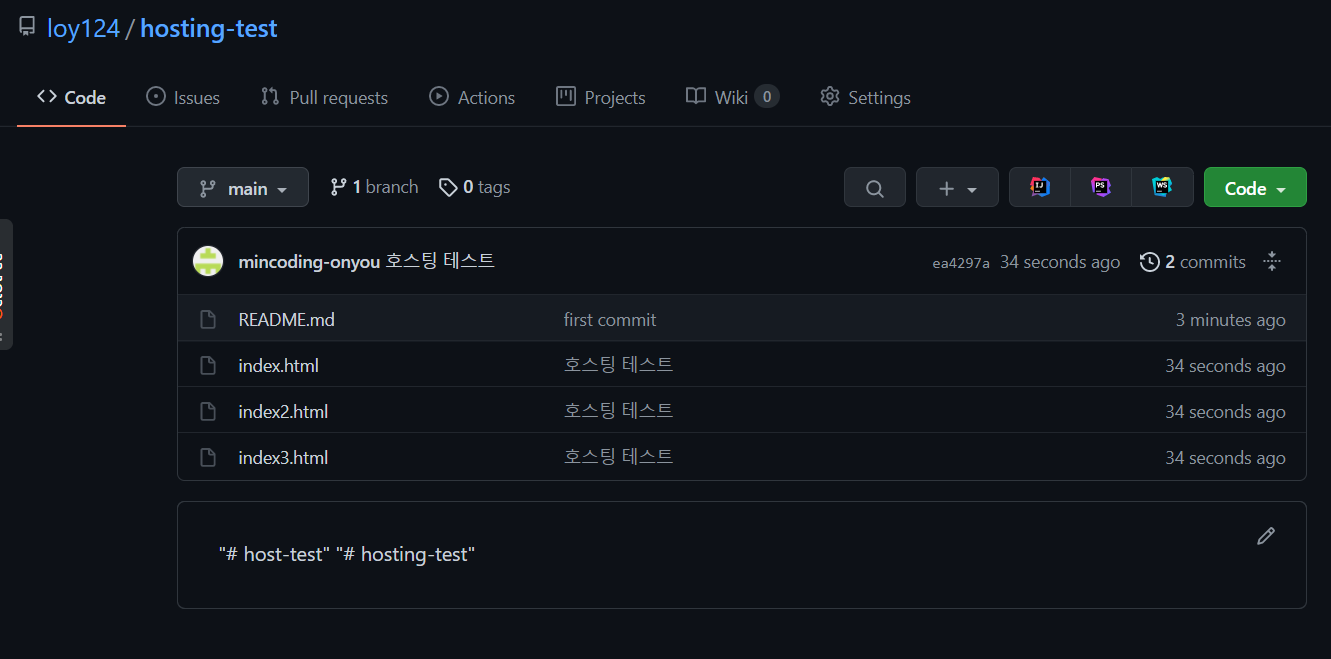
이렇게 README.md 가 추가된채로 GTIHUB에 내용이 추가된것을 확인 할 수 있다.
여기까지 진행했다면
이제 아까 만든 index.html 1, 2, 3 을 Online Repository에 넣어주기위해 해당 명령어를 작성한다.
git add .

git commit -m "호스팅 테스트"

git push
해당 push까지 마치고 나면

아까 생성했던 기본 html 파일들이 추가된 것을 확인 할 수 있다.
2. github을 활용한 호스팅 진행하기
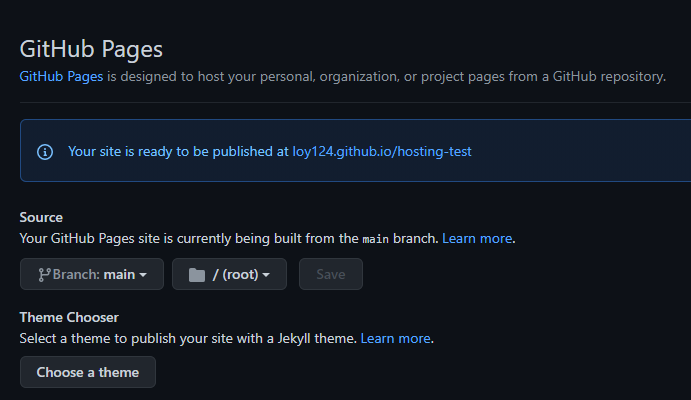
Online Repository -> Settings -> Pages에 접근하면 된다.

그후 Source -> branch 선택에 가서 방금 추가한 main branch를 추가해주고 폴더 위치는 그대로 root에 둔 후 Save

save 되면 페이지가 활성화 준비중이라는 메세지가 나오고

한번 더 새로고침하면

초록불로 변환되며
해당 사이트에 접근 할 수 있게된다.
주의
(반드시 index.html이라는 파일이 존재해야 해당 index을 기본값으로 접근이 가능하다.)
여기까지 진행하면 누구나 손쉽고 무료로 정적 페이지 웹 호스팅이 가능해진다.
https://loy124.github.io/vue-movie/
vue-movie
loy124.github.io
위를 활용해 호스팅한 영화 소개 페이지

'Git' 카테고리의 다른 글
| GIT 기초 명령어 및 GITHUB와 연동하기 및 삭제하기 (0) | 2019.12.12 |
|---|
