https://loy124.tistory.com/204 (s3 서버 구축하기)
https://loy124.tistory.com/205?category=768865 (s3 CloudFront와 연동하기)
기초 셋팅
https://loy124.tistory.com/206
백엔드 구성편
https://loy124.tistory.com/207
프론트 구성편
https://loy124.tistory.com/208
Spring-boot를 활용해서 mysql및 mybatis와 연동해서 aws s3에 이미지및 파일을 업로드하는 예제를 만들었다.

maven 프로젝트로 진행하였다.
pom.xml
<?xml version="1.0" encoding="UTF-8" ?>
<project xmlns="http://maven.apache.org/POM/4.0.0" xmlns:xsi="http://www.w3.org/2001/XMLSchema-instance" xsi:schemaLocation="http://maven.apache.org/POM/4.0.0 https://maven.apache.org/xsd/maven-4.0.0.xsd">
	<modelVersion>4.0.0</modelVersion>
	<parent>
		<groupId>org.springframework.boot</groupId>
		<artifactId>spring-boot-starter-parent</artifactId>
		<version>2.2.5.RELEASE</version>
		<relativePath /> <!-- lookup parent from repository -->
	</parent>
	<groupId>com.example</groupId>
	<artifactId>room</artifactId>
	<version>0.0.1-SNAPSHOT</version>
	<name>room</name>
	<description>구해방 프로젝트</description>

	<properties>
		<java.version>1.8</java.version>
	</properties>

	<dependencies>

		<dependency>
			<groupId>org.springframework.boot</groupId>
			<artifactId>spring-boot-starter-jdbc</artifactId>
		</dependency>
		<dependency>
			<groupId>org.springframework.boot</groupId>
			<artifactId>spring-boot-starter-web</artifactId>
		</dependency>
<!--		<dependency>-->
<!--			<groupId>org.mybatis.spring.boot</groupId>-->
<!--			<artifactId>mybatis-spring-boot-starter</artifactId>-->
<!--			<version>2.1.2</version>-->
<!--		</dependency>-->


		<dependency>
			<groupId>mysql</groupId>
			<artifactId>mysql-connector-java</artifactId>
			<scope>runtime</scope>
		</dependency>
		<dependency>
			<groupId>org.projectlombok</groupId>
			<artifactId>lombok</artifactId>
			<optional>true</optional>
		</dependency>
		<dependency>
			<groupId>org.springframework.boot</groupId>
			<artifactId>spring-boot-starter-test</artifactId>
			<scope>test</scope>
			<exclusions>
				<exclusion>
					<groupId>org.junit.vintage</groupId>
					<artifactId>junit-vintage-engine</artifactId>
				</exclusion>
			</exclusions>
		</dependency>
		<dependency>
			<groupId>org.springframework.boot</groupId>
			<artifactId>spring-boot-devtools</artifactId>
		</dependency>
		<dependency>
			<groupId>org.springframework.boot</groupId>
			<artifactId>spring-boot-starter-data-jpa</artifactId>
		</dependency>

		<dependency>
			<groupId>org.mybatis.spring.boot</groupId>
			<artifactId>mybatis-spring-boot-starter</artifactId>
			<version>1.3.2</version>
		</dependency>


		<dependency>
			<groupId>org.mybatis</groupId>
			<artifactId>mybatis-spring</artifactId>
			<version>1.3.2</version>
		</dependency>

		<dependency>
			<groupId>org.mybatis</groupId>
			<artifactId>mybatis</artifactId>
			<version>3.4.6</version>
		</dependency>

		<dependency>
			<groupId>com.amazonaws</groupId>
			<artifactId>aws-java-sdk</artifactId>
			<version>1.11.106</version>
		</dependency>

		<dependency>
			<groupId>org.springframework.boot</groupId>
			<artifactId>spring-boot-configuration-processor</artifactId>
			<optional>true</optional>
		</dependency>
	</dependencies>

	<build>
		<plugins>
			<plugin>
				<groupId>org.springframework.boot</groupId>
				<artifactId>spring-boot-maven-plugin</artifactId>
			</plugin>
		</plugins>
	</build>

</project>
기초 셋팅하기
application.properties
server.port=8081
spring.datasource.url=jdbc:mysql://localhost:3306/스키마이름?allowMultiQueries=true&useSSL=false&useUnicode=true&characterEncoding=utf8&serverTimezone=Asia/Seoul
spring.datasource.driver-class-name=com.mysql.cj.jdbc.Driver

# db response name
spring.datasource.username=디비 아이디
#db response password
spring.datasource.password=비밀번호

spring.jpa.show-sql=true

spring.jackson.property-naming-strategy=SNAKE_CASE

# max file size
spring.servlet.multipart.max-file-size=100MB
# max request size
spring.servlet.multipart.max-request-size=100MB
# files storage location (stores all files uploaded via REST API)

spring.servlet.multipart.enabled=true

cloud.aws.credentials.accessKey= 액세스키
cloud.aws.credentials.secretKey= 시크릿키
# AWS S3 bucket

cloud.aws.s3.bucket=s3 버킷 이름
cloud.aws.region.static=ap-northeast-2
cloud.aws.stack.auto=false


mybatis.configuration.map-underscore-to-camel-case=true
기초셋팅하기

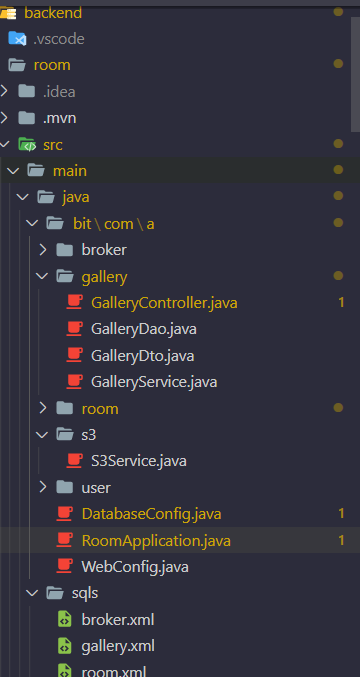
gallery 폴더: 이미지관련 controller, dao, dto, service 종합
s3 폴더: aws업로드 관련 service
sqls: mybatis 관련파일
mybatis기초 세팅
DatabaseConfig.java 파일
package bit.com.a;

import java.util.Properties;

import javax.servlet.annotation.MultipartConfig;
import javax.sql.DataSource;

import org.apache.ibatis.session.SqlSessionFactory;
import org.mybatis.spring.SqlSessionFactoryBean;
import org.mybatis.spring.SqlSessionTemplate;
import org.mybatis.spring.annotation.MapperScan;
import org.springframework.context.annotation.Bean;
import org.springframework.context.annotation.Configuration;
import org.springframework.core.io.Resource;
import org.springframework.core.io.support.PathMatchingResourcePatternResolver;

@Configuration
@MapperScan(basePackages = "bit.com.a")
public class DatabaseConfig {

	@Bean
	public SqlSessionFactory sqlSessionFactory(DataSource dataSource) throws Exception {
		System.out.println("DatabaseConfig sqlSessionFactory");

		SqlSessionFactoryBean sqlSessionFactoryBean = new SqlSessionFactoryBean();
		Properties prop = new Properties();
		prop.setProperty("mapUnderscoreToCamelCase", "true");
		sqlSessionFactoryBean.setDataSource(dataSource);
		sqlSessionFactoryBean.setConfigurationProperties(prop);
		/*
		 * sqlSessionFactoryBean.getObject().getConfiguration().
		 * setMapUnderscoreToCamelCase(true);
		 */

		Resource myBatisConfig = new PathMatchingResourcePatternResolver().getResource("classpath:mybatis-config.xml");
		sqlSessionFactoryBean.setConfigLocation(myBatisConfig);
		Resource[] arrResource = new PathMatchingResourcePatternResolver().getResources("classpath:sqls/*.xml");
		sqlSessionFactoryBean.setMapperLocations(arrResource);

		return (SqlSessionFactory) sqlSessionFactoryBean.getObject();
	}

	@Bean
	public SqlSessionTemplate sqlSession(SqlSessionFactory sqlSessionFactory) {
		return new SqlSessionTemplate(sqlSessionFactory);
	}
}
WebConfig.java 파일
package bit.com.a;

import org.springframework.context.annotation.Configuration;
import org.springframework.web.servlet.config.annotation.CorsRegistry;
import org.springframework.web.servlet.config.annotation.WebMvcConfigurer;

@Configuration
public class WebConfig implements WebMvcConfigurer {

	@Override
	public void addCorsMappings(CorsRegistry registry) {
		// WebMvcConfigurer.super.addCorsMappings(registry);

		registry.addMapping("/**").allowedOrigins("*");

	}

}
/*
 * 크로스도메인 이슈란? Ajax 등을 통해 다른 도메인의 서버에 url(data)를 호출할 경우 XMLHttpRequest는 보안상의 이유로
 * 자신과 동일한 도메인으로만 HTTP요청을 보내도록 제한하고 있어 에러가 발생한다. 내가 만든 웹서비스에서 사용하기 위한 rest api
 * 서버를 무분별하게 다른 도메인에서 접근하여 사용하게 한다면 보안상 문제가 될 수 있기 때문에 제한하였지만 지속적으로 웹 애플리케이션을
 * 개선하고 쉽게 개발하기 위해서는 이러한 request가 꼭 필요하였기에 그래서 XMLHttpRequest가 cross-domain을 요청할
 * 수 있도록하는 방법이 고안되었다. 그것이 CORS 이다.
 *
 * CORS란? CORS(Cross-origin resource sharing)이란, 웹 페이지의 제한된 자원을 외부 도메인에서 접근을
 * 허용해주는 메커니즘이다.
 *
 * 스프링에서 CORS 설정하기. 스프링 RESTful Service에서 CORS를 설정은 @CrossOrigin 어노테이션을 사용하여 간단히
 * 해결 할 수 있다. RestController를 사용한 클래스 자체에 적용할 수 도 있고, 특정 REST API method에도 설정
 * 가능하다. 또한, 특정 도메인만 접속을 허용할 수도 있다.
 */
RoomApplication.java파일
package bit.com.a;

import org.mybatis.spring.annotation.MapperScan;
import org.springframework.boot.SpringApplication;
import org.springframework.boot.autoconfigure.SpringBootApplication;
import org.springframework.boot.context.properties.EnableConfigurationProperties;

@SpringBootApplication
@MapperScan(basePackages = "bit.com.a")
public class RoomApplication {

	public static void main(String[] args) {
		SpringApplication.run(RoomApplication.class, args);
	}

}
이것으로 기초 셋팅은 끝이났다.
반응형
'Java > Spring-boot' 카테고리의 다른 글
| Spring boot AOP를 활용한 로그 추적하기, 메서드 시간 측정하기 (0) | 2023.07.07 |
|---|---|
| AOP정의 및 Advice, Pointcut 작성 정리 (0) | 2023.07.06 |
| Spring-boot(mysql-mybatis-aws s3(cloudFront) + Vue.js 를 활용한 파일 업로드 하기 - 백엔드 구성 (0) | 2020.04.12 |
| 이클립스(스프링 sts)에서 Spring-boot, Jpa 사용 하기 (2) (0) | 2020.03.15 |
| 이클립스(스프링 sts)에서 Spring-boot, Jpa 사용 하기 (1) (0) | 2020.03.15 |


